Thursday 10 November 2011

PAZHAM PORI/ETHAKKA APPAM/BANANA FRITTERS - A regular easy snack and a little more...!

After a short unintentional break from blogging, here I come with one of the easiest tea time snack - 'Pazham pori'/'Ethakka appam', an authentic Kerala cuisine.

This is one of the easiest snacks which you would find in most of the households, bakeries, tea stalls in fact everywhere in Kerala.

The only variety of banana used for this snack is called Ethapazham in Malayalam and Nenthram pazham in Tamil. The raw plantain is used for making chips, powdered and used as baby food and in many other savouries, whereas the ripe ones go for sweets and snacks.

INGREDIENTS 

2 ----- ETHAPAZHAM
1cup ----- MAIDA
1/2 cup -----RICE POWDER (may omit if not available) 
2tsp ----- SUGAR (add more if the fruit is not sweet enough)
1tsp ----- JEERA (Optional)
1/2tsp ----- SALT
A pinch ---- TURMERIC (for colour)
Coconut Oil to deep fry

METHOD

Cut the banana into half and again into half vertically

  • Make a slightly thick batter by mixing maida, rice flour, sugar, jeera, salt, turmeric and enough water
  • Check for salt and sugar then dip the pieces of banana in the batter

  • Heat the coconut oil until hot, but not smoking hot. Slowly drop in the plantains dipped in batter

  • Deep fry on both sides until golden brown. Drain on a kitchen paper. Serve hot

  • By adding rice powder the appam remains crsipy from outside and soft inside

Ok, so you have some batter left out??? don't throw away! It makes a snack by itself..........how?


  • Add 1tsp sugar to the left out batter and 1/2tsp baking powder. Mix well and pour it on a greased and hot paniyarm chatti
  • Cook on both sides and remove. A fresh, crispy and soft snack is ready in no time!

For people who cannot digest oily food, try the steamed version of this ethapazham. It's healthy, soft to digest with all its nutrition intact

  • Wash the ripe banana and trim the edges. Cut the banana into three equal parts. Place it on an idly maker or steamer and steam for about five minutes
  • Once done remove from the steamer or else it turns mushy. Peel the plantain and serve warm or cold.


Thursday 29 September 2011

THENGA CHAMMANTHI - Simple Coconut chutney for Idly/Dosa : First Blog Award


I'm so used to Tamil Nadu style of eating idly and dosa with a mix of chutney and sambar. I like a combination of thick coconut chutney  and a thin sambar with those 'malligai povu idlis' and the crispy 'nei roast'. 

When this cannot be a regular affair I like to have the Kerala style simple thenga chammanthi, which goes very well with idly and dosa. 

INGREDIENTS

1 cup ----- COCONUT  (grated or diced)
1tsp ----- RED CHILLY POWDER
1 ----- DRY RED CHILLY                       
3 to 4 ----- SHALLOTS
1/4tsp ----- MUSTARD SEEDS
1 spring ----- CURRY LEAVES
SALT
OIL
(Optional - a small bit of tamarind. I don't use it)

METHOD

Grind together coconut, red chilly powder, salt, 2-3 curry leaves, and shallots (spare one and add the rest)

Make a fine smooth paste by adding enough water

Seasoning - heat oil in a pan add mustard seeds, dry red chilly, curry leaves and a finely cut shallot

Roast until they turn dark brown. Now add the ground coconut mixture along with a cup or more water. Check for salt and adjust

Simmer it for a few minutes but let it not boil. Remove from flame and serve.

NOTE

The consistency of the chammanthi can be adjusted to one's taste and liking

If there is any leftover put it in fridge, use it later after a quick heating. The taste remains the same

Adding raw red chilly powder  may sound weird, but tastes awesome! 

Liebster Blog Award:


I received my first ever blog award from my blogger friend Shabs of  Yum & Delish  on her 100th post

The Liebster blog award is a recognition for adding visibility to worthy blogs. I thank you Shabs for remembering me for this recognition. As it was my first award here I asked Shabs for more details and she was kind enough to write back to me :-) 

The word ‘ Liebster “ is a German word, that essentially means ‘ dear ‘ and is derived from the verb ‘ lieber ‘ which means “ to love “.


Upon receipt of the Liebster Award, there are a very simple rules:


1. Thank the giver who gave the award and link back to his / her blog.
2. Choose 5 blogs whom you would like to give this award and let them know by leaving a comment on their blog.
3. Copy and paste the award on your blog.
4. Hope that your followers will spread the love to other bloggers as well.
5. Thank all who read your blog and wish to follow you and of course - have fun!

I would love to share this award with the following blogger friends of mine. Please do check out their beautiful  blog page.

Julie of Erivum puliyum


Sunday 25 September 2011

STUFFED BRINJAL FRY - Aubergines stuffed

You see tender, small brinjals at the vegetable mart????? Grab some of them and try this stuffed brinjal fry, you would love them. I like the purple brinjals, though you can try with green as well. There are many variations to the stuffing recipe, but I'm sure that this is one of the best my mom used to make and I learnt it from her.


INGREDIENTS

10  -----     SMALL BRINJALS
1 cup ----- GRATED COCONUT
3  -----    GREEN CHILLIES
1/2tsp ---- FENNEL SEEDS or SAUNF
1 piece --- GINGER
1 pod ---- GARLIC
2 ----- SHALLOTS
CORIANDER LEAVES
CURRY LEAVES
SALT
OIL

METHOD

  • Grind coconut with fennel seeds, green chillies, ginger, garlic, shallots, coriander leaves, curry leaves and a little salt to a smooth paste. Do not add water

  • Wash and dry the brinjals. Slit from the top leaving the stem as it is (see pic)


  • Stuff the brinjals tight with the ground masala, filling all the corners and top. Keep all of them readily stuffed.


You can tie the stuffed brinjal with a clean thick thread or fix together with a tooth pick. I didn't have any, still went ahead.  Any method you use, be prepared for a little filling to sweep out to the oil while frying

  • Fry the brinjals in batches on a slow medium flame. Deep frying is not required so keep the oil level as low as possible


  • Slowly turn down on all sides so that the stuffing becomes light brown and the brinjals are evenly cooked. Drain and remove from oil
Stuffed brinjal fry goes well with hot rice and any curry. I relish it with curd rice!


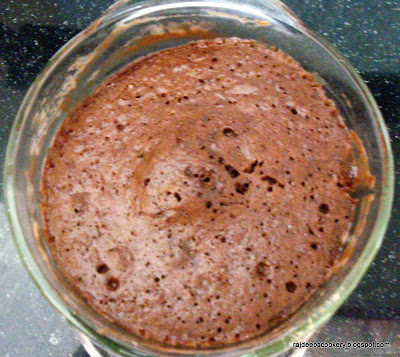
CHOCOLATE MUG CAKE - Simple microwave cake in a minute!

I'm an ardent fan of Nigella Lawson for her versatile cooking, easy recipes and screen persona on television. Her cookery show spells magic with every whisk in her kitchen, and  I try never to miss her TV show 'Nigella Kitchen' every night at 2200 hrs IST.

For those who are less familiar with this beautiful star icon, Nigella Lawson is a British food writer, journalist and broadcaster with some of her bestselling cookery books worldwide. Here, I tried one of her easiest recipes the chocolate mug cake for two http://www.nigella.com/recipes/view/chocolate-mug-cake-for-two-3564  which was just awesome. It took me five mins preparation time + 1 min cooking time in a microwave.

Before I move on, two things I want to mention here is
1. I did not have microwave safe tall mugs so  I used two glass bowls, contrasting the title
2. I placed a few cherries on top as a feast to the eyes, the original recipe does not include it. Though ice cream toppings are suggested.

INGREDIENTS

4tbs ----- FLOUR
5tbs -----  SUGAR
3tbs -----  COCO POWDER
a pinch of  SALT
1      -----  EGG  (lightly beaten)
3tbs ----- MILK
3tbs ----- BUTTER or OIL
1tsp ----- VANILLA ESSENCE

METHOD

Take two microwave safe mugs and add 2tbs of flour in each of them. I used self raising flour.
Equally add the sugar, coco powder and salt to the mugs and give it a good mix
The same way add milk, oil, vanilla essence and the beaten egg. Now mix it up well and keep both the mugs ready

Place one mug at a time in the microwave cook mode and cook for 1minute

The cooking time slightly differs according to the microwave. It is better to initially cook for a minute, check the content and again keep it for 30 seconds if required
Do remember the content cooks a little more even after it is removed from the microwave. So adjust the timing accordingly to get a soft and moist cake

Let it cool down for a while and........indulge!


Tuesday 20 September 2011

CHICKEN MOMOS - Steamed Dumplings filled with Chicken


Steamed momos is one of our favourite snacks while going out on weekend shopping. This traditional delicacy of Nepal, Tibet, Bhutan and few adjoining South Asian regions come in different shapes, sizes and with a variety of fillings both veg and non-veg.

One day while eagerly dumping down these dumplings, I curiously enquired about its making to the momo seller. He gave me a quick briefing and I registered every word that fell from his mouth. I decided to try these at home, slightly modified to suit our taste and here I'm sharing it with you - the luscious momos!

INGREDIENTS

MAIDA FLOUR ----- 1 cup
CHICKEN ----- 4 to 5 pieces
ONION -----  1 medium
GARLIC ----- 3 pods
GINGER ----- 1 small piece
GREEN CHILLY ---- 1 to 2
SOY SAUCE ----- 1 tbsp 
SALT
OIL

METHOD

Add salt to the flour, mix well and knead it stiff using little water. Keep it covered with a damp cloth to avoid drying (see pic 1)

 I marinated the chicken pieces with a tablespoon of curd, chilly powder, pepper powder, ginger - garlic paste and salt. Cooked it with the marination until soft and minced the boneless meat. This is the change I made from the original recipe

Chop onion, green chilly, ginger and garlic to very fine pieces (see pic 3)


In a pan heat a little oil, add all the chopped items and stir with a little salt. Sauté until the crispness of onion is lost and its tender. May be for about 4 mins. Add the soy sauce and mix well

Put the minced chicken, give a good stir and let it fry for about 3 mins. The colour slightly changes dark since soy sauce is added. Put off the flame (see pic 4)

For the wrap, take the resting dough knead it once and divide it into small balls, roll it thin and cut them into small rounds. I used a small bowl to help me with this geometry. Experts roll it out small and even without any tools! (see pic below)

Take one wrap place some filling in the centre and seal the centre first by spreading a little water to the edges (see pic 6) 

Though there are different ways of sealing the momos, I prefer this crescent shape sealing for its look  and ease

Seal the edges well by pushing the filling in and pleat the edges tight (see pic 7,8)

Pinch the dough next to the pleat on both sides so that the wrap is tight and sealed well (see pic 9).

Do the same with all the wraps and place them in a steamer


Steam them until cooked. It took me 7mins in an electric steamer.

The momos turn shiny and glazy once cooked and do not stick to hand. This is an indication that they are cooked well

Serve momos hot with a simple garlic n ginger dip. 

For the dip, fry a little finely chopped garlic and ginger and add some red chilly paste. Put a little salt and 1tbsp tomato sauce. Pour little water and bring to a boil. Hot and tangy sauce is ready!


Tuesday 6 September 2011

ORANGE PEEL CANDY

While I was browsing through a blog I met with an interesting post. I sat glued to my seat until I read it completely and then tried it in my kitchen immediately. Came back and posted a comment on Kevin's blog ''Closet Cooking''. The original recipe can be seen in the link http://www.closetcooking.com/2011/02/candied-orange-peel.html

This recipe was simple, easy and made out of just 3 ingredients. It's chewy, crunchy and the best part is that the main ingredient of this recipe is orange peel, which is mostly discarded by us.

The original recipe had 3 oranges and 1 cup sugar, but I tried with 1 orange as a tester with the same 1 cup sugar. It was good since the oranges were slightly sour and I didn't want the bitter taste to predominate.

INGREDIENTS
ORANGE ---- 1
SUGAR ----- 1 cup
WATER ----- 2 cups

METHOD

Cut the top part of the orange. Make four slits on the top skin               
Peel the skin and you shall get four pieces


Slice them thin and long


Boil 4 cups of water in a pan and cook the orange slices for 15 mins. Drain and rinse well. This helps to remove the bitter taste of the peel


Mix sugar with 2 cups of water and bring to a boil. Add the cooked peels to it. Simmer and let it cook tender for another 45 mins


Drain the peels from sugar syrup and roll it in a plate of sugar. The sugar granules will coat the peels. Note to drain the syrup well or else they would soak when rolled in sugar

Leave it to dry for a few hours. Enjoy!

CHEMMEEN THEEYAL - Prawns curry Kerala Style


Hyderabad offered me with some fresh prawns and I was all excited to make my favourite dry roast out of it. ''No, no make a curry'' a voice came from behind. As usual my hubby wanted a gravy dish. Hmmm...! it is always good to see a happy face eating the food we cook, so I let go to his taste.

In the fridge, there was some grated coconut. Since we were travelling home for Onam in a day, I was thinking of using it up. So I decided to make this chemmeen curry with coconut (now you know the real reason why I let go to his taste !) 

INGREDIENTS
PRAWNS ----- 500 gms
GRATED COCONUT --- a small cup
ONION ----- 1 small
SHALLOTS ---- 6 to 7
CRUSHED GARLIC --- 3 to 4
CHILLY POWDER ---- 2tsp
CORIANDER POWDER --- 1tsp
TURMERIC POWDER --- 1/2 tsp
DRY RED CILLIES ---- 3 nos
KUDAMPULI ---- 2 to 3 or (tamarind)
VINEGAR ---- few drops 
SALT
OIL
CURRY LEAVES

METHOD
  • Clean the prawns and marinate it for an hour with a mixture of little salt, chilly powder, turmeric powder, crushed garlic and vinegar
  • Soak the kudampuli  in warm water. It is called 'Indian garcinia' in English. It is a type of dried tamarind with medicinal properties and is widely used in Kerala cuisine for the flavour and taste

Finely slice the shallots and chop the onions


  • Roast the grated coconut until brown. Add chilly and coriander powder, I use Kashmiri chilly. Roast it until the raw smell is gone. Cool and grind it to a thick fine paste
                             
On a hot tawa, slightly shallow fry the marinated prawns to give it a good flavour with the masala


  • In a hot pan add oil and crack the dry red chillies, add  generous springs of curry leaves. As they splutter add the onions and sauté them with little salt. Let the onions fry until light brown
  • Add the soaked kudampuli with the water and let it start boiling
  • Add the prawns, cover and cook. Prawns cook very fast. Overcooking will make it tough. Since it is slightly tossed in oil, need to cook it  for 5mins only
  • Add the ground paste to the prawns, mix well and simmer for about 10mins. Check for salt. Add a drizzle of coconut oil and give a stir. Prawns taste best in coconut oil. This step is optional I added it since I like the taste of fresh coconut oil. Serve with rice.